Mikrotik web proxy simple configuration - Web Proxy is one of the features in mikrotik router. By using this web proxy feature, you can save internet bandwidth and speed up the connection, because when you and your users accessing a website, some of the content of the website will be cache in memory or disk mikrotik. And when you open a website that is stored in the cache mikrotik, access to the website will be faster
without going through an internet connection. In addition, the proxy feature still has many other functions.
without going through an internet connection. In addition, the proxy feature still has many other functions.
This is step by step mikrotik web proxy setup guide :
1. Access to your mikrotik router using winbox
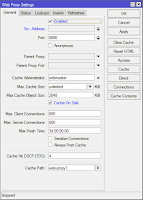
2. Go to IP => Web Proxy
3. Checklist on the Enable checkbox to enable this feature
4. Enter the proxy port. By default is 8080, and you can change it.
4. Enter the proxy port. By default is 8080, and you can change it.
5. Checklist on Cache On Disk checkbox
Ok, your web proxy is active now. To use it you must manually configure proxy on your browser with mikrotik ip address (gatheway LAN) as a proxy IP address and port 8080. This method is not practically and efficient, therefore you have to make it a Transparent Proxy.
How to settings Transparent Proxy on mikrotik router
This is step by step how to configure your web proxy become transparent proxy.
1. Access to your mikrotik router using winbox
2. Go to IP => Firewall => NAT => General select the parameter values as shown below :
2. Go to IP => Firewall => NAT => General select the parameter values as shown below :
Chain : dstnatProtocol : 6 (tcp)Dst. Port : 80
3. On Action Tab, and select the parameter values as shown below :
Action = redirectTo Port = 8080
4. You can copy and paste the script below into the terminal console mikrotik
ip firewall nat add chain=dstnat protocol=tcp dst-port=80 action=redirect to-ports=8080
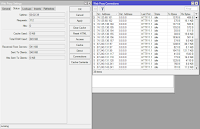
5. Done. Transparant Proxy already active now and you can check it on Status Tab and Connection. Please see the capture below
5. You can also check your proxy already active or not, with access to ip gatheway LAN. Please see the capture below


0 Response to "Mikrotik web proxy simple configuration"
Post a Comment